Embellish is for BOYS!

I am part of the Emblish Is For Boys series on Gracious Threads! This week I was challenged to use zippers and/or hardware to embelish a boys tshirt! Here is my post for her blog:

First off a huge THANK YOU to Jess for inviting me on this awesome series and for giving me a little push out of my comfort zone. Now let’s start the introductions. My name is Rebekah from RebekahSews. I am excited to say that I recently started a Facebook page too! If you have seen my work around you have most likely seen my baby girl modeling most items. Sprinkled here or there are my two crazy yet imaginative boys. Let’s face it; it is harder to sew for boys. Fewer patterns, less frills, and some would say less fun. Not so! There is plenty of fun for boys, especially if you get a little creative. I am loving all the ideas since this series started.

RTC_6524


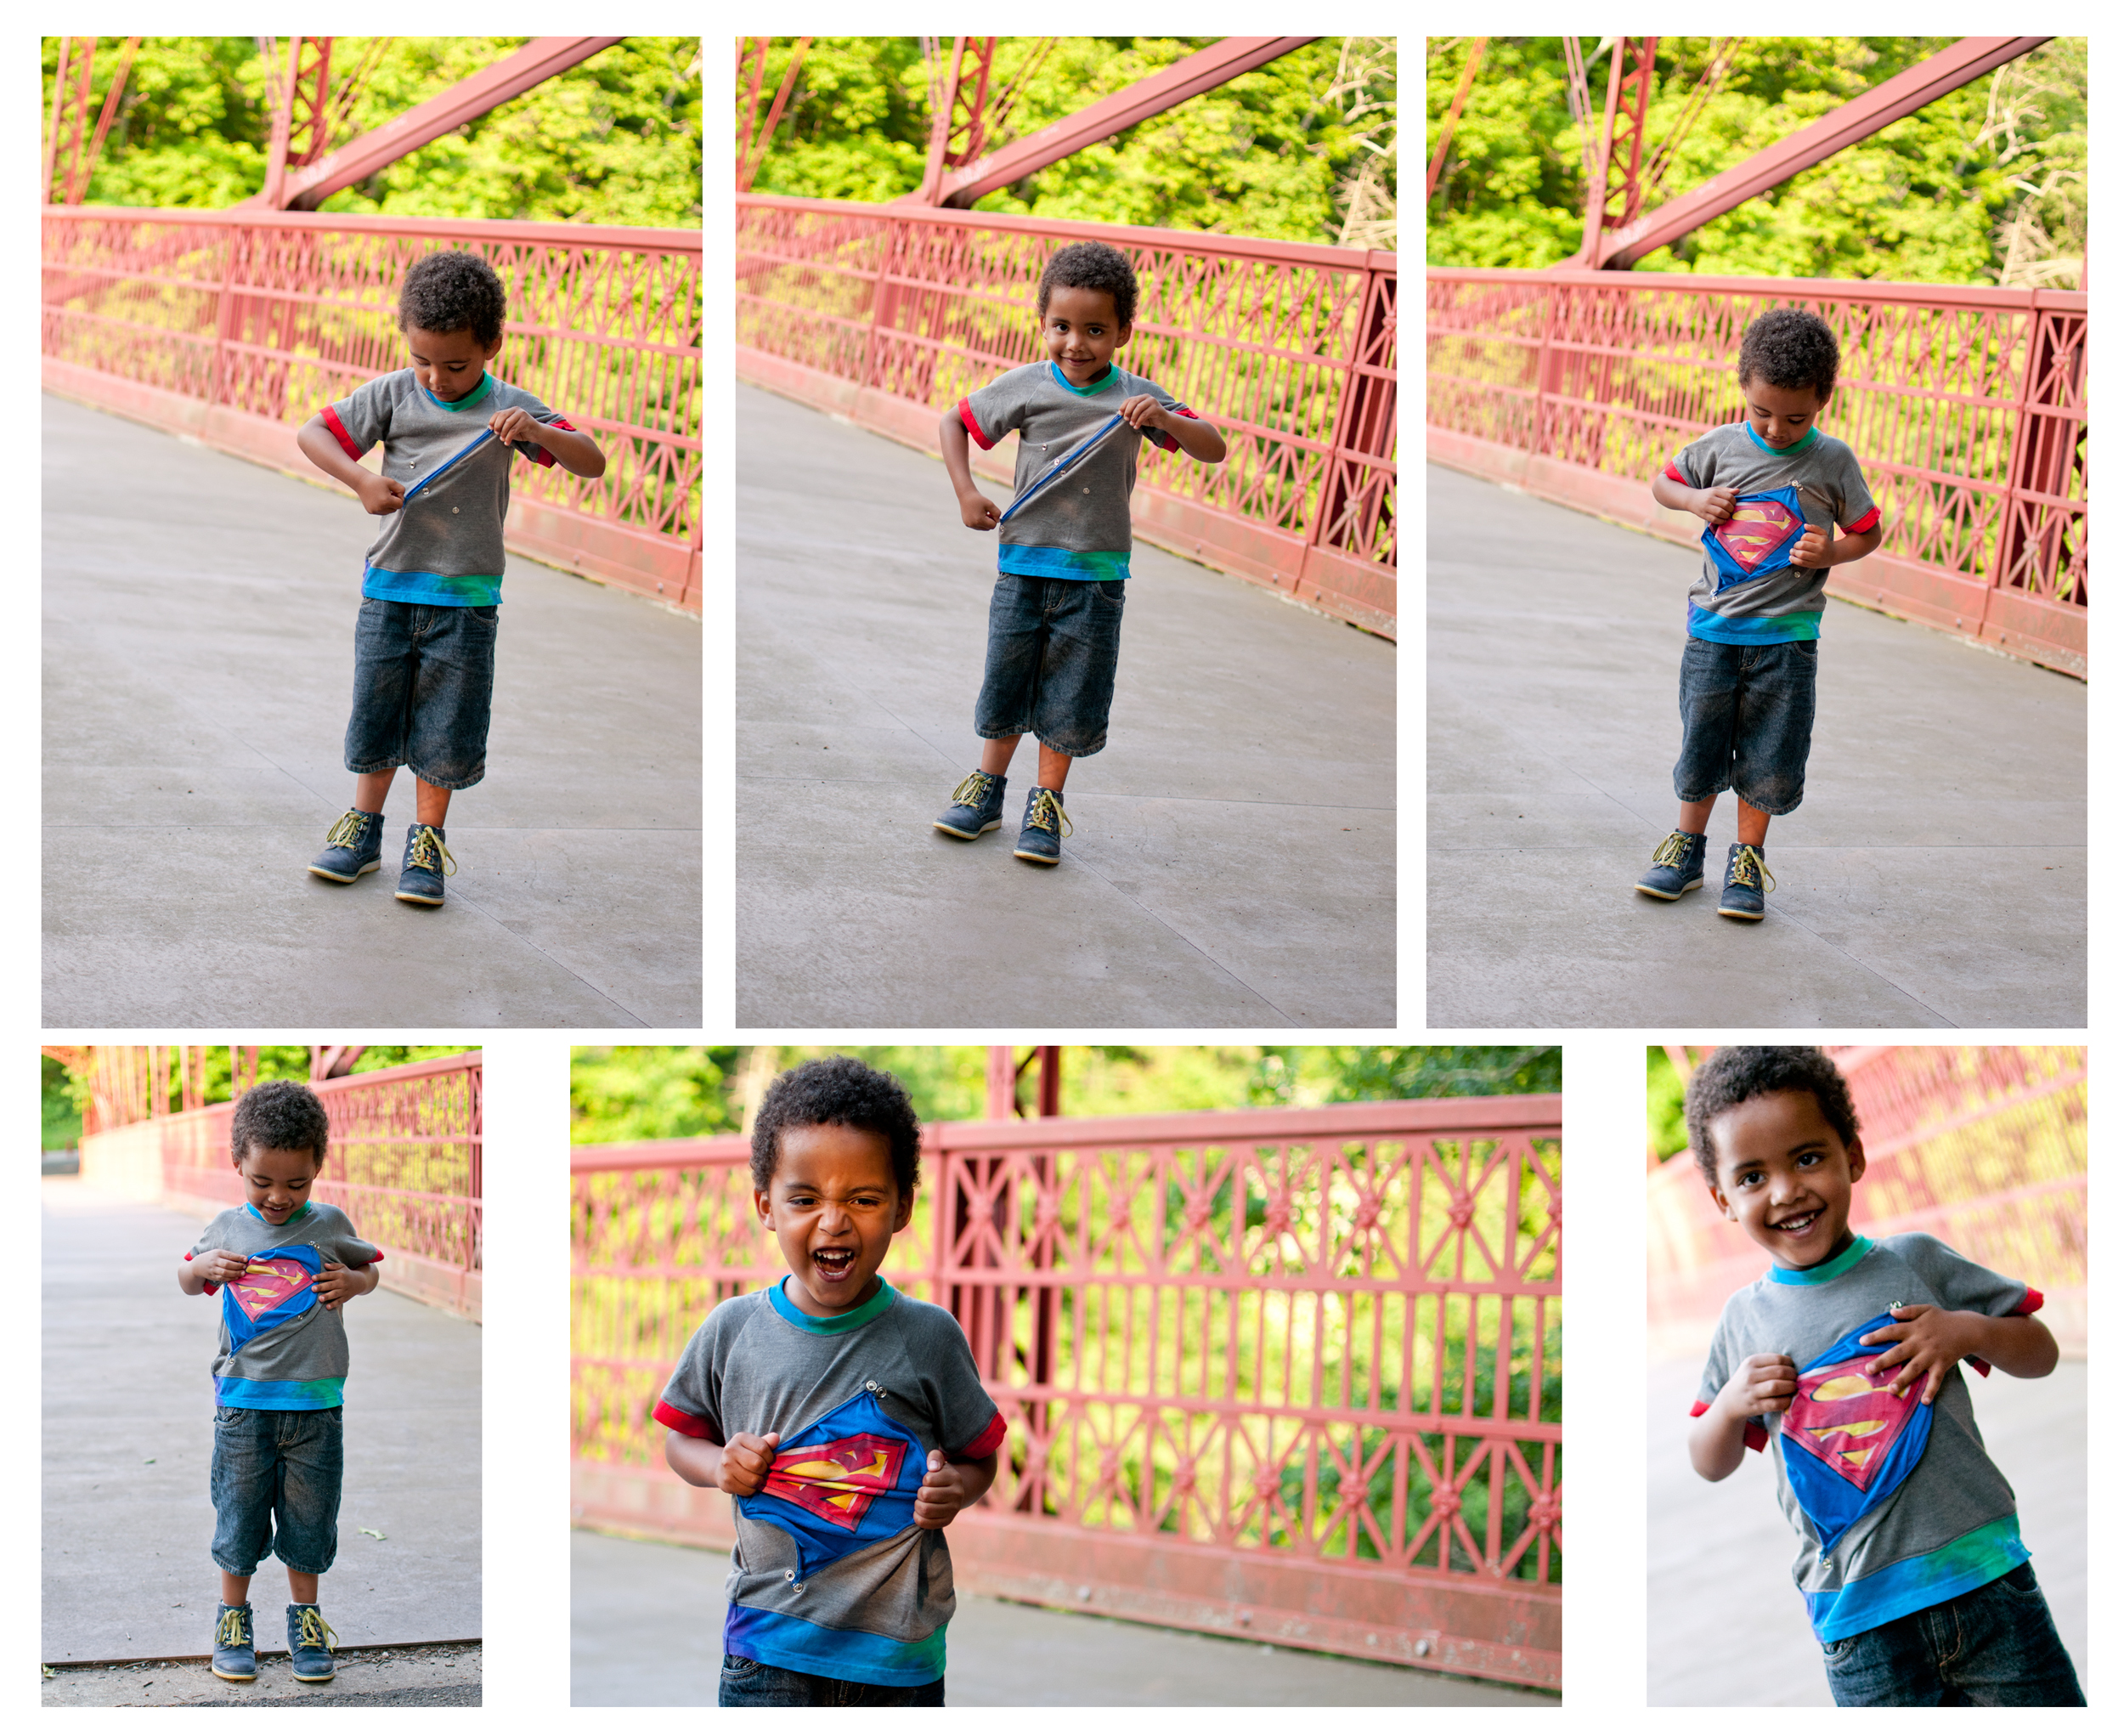
When Jess first asked me to be apart of this week I think I may have asked her a couple of times if there was any other theme dates available until I finally decided it was time to just take the plunge and work with zippers and hardware. I don’t work with zippers…period. I think I may have installed one once upon a time. Honestly I don’t remember. Perhaps I blocked it out? So now I needed to add a zipper to a shirt for a boy. What was I possibly going to do?? As I was changing out my boys winter to summer wardrobes I came across a too small Superman shirt. That finally started the wheels turning. I don’t know about you but there is always a little thrill when Clark Kent opens his shirt to reveal Superman underneath. Now what if I could give that to my boys? They would love it! So this shirt was created. I used the Lane Raglan pattern by Stitchwerx Designs for my base t-shirt and went from there.

RTC_6544


Besides the zipper across the center there are two snaps at the top and bottom. Those are pure decoration (and also hiding my not so great cutting when I cut the area for the zipper! Who else loves happy accidents?) Then on either side of the zipper are two more snaps. These are functional as you will see in the photos further down. Now for the big reveal!!!!

Untitled-1


I think he was pretty happy with that. When I first showed him the shirt, his response was, “This is awesome!!! Can I keep it?” I think he may have asked several more times while I was taking photos.

RTC_6658


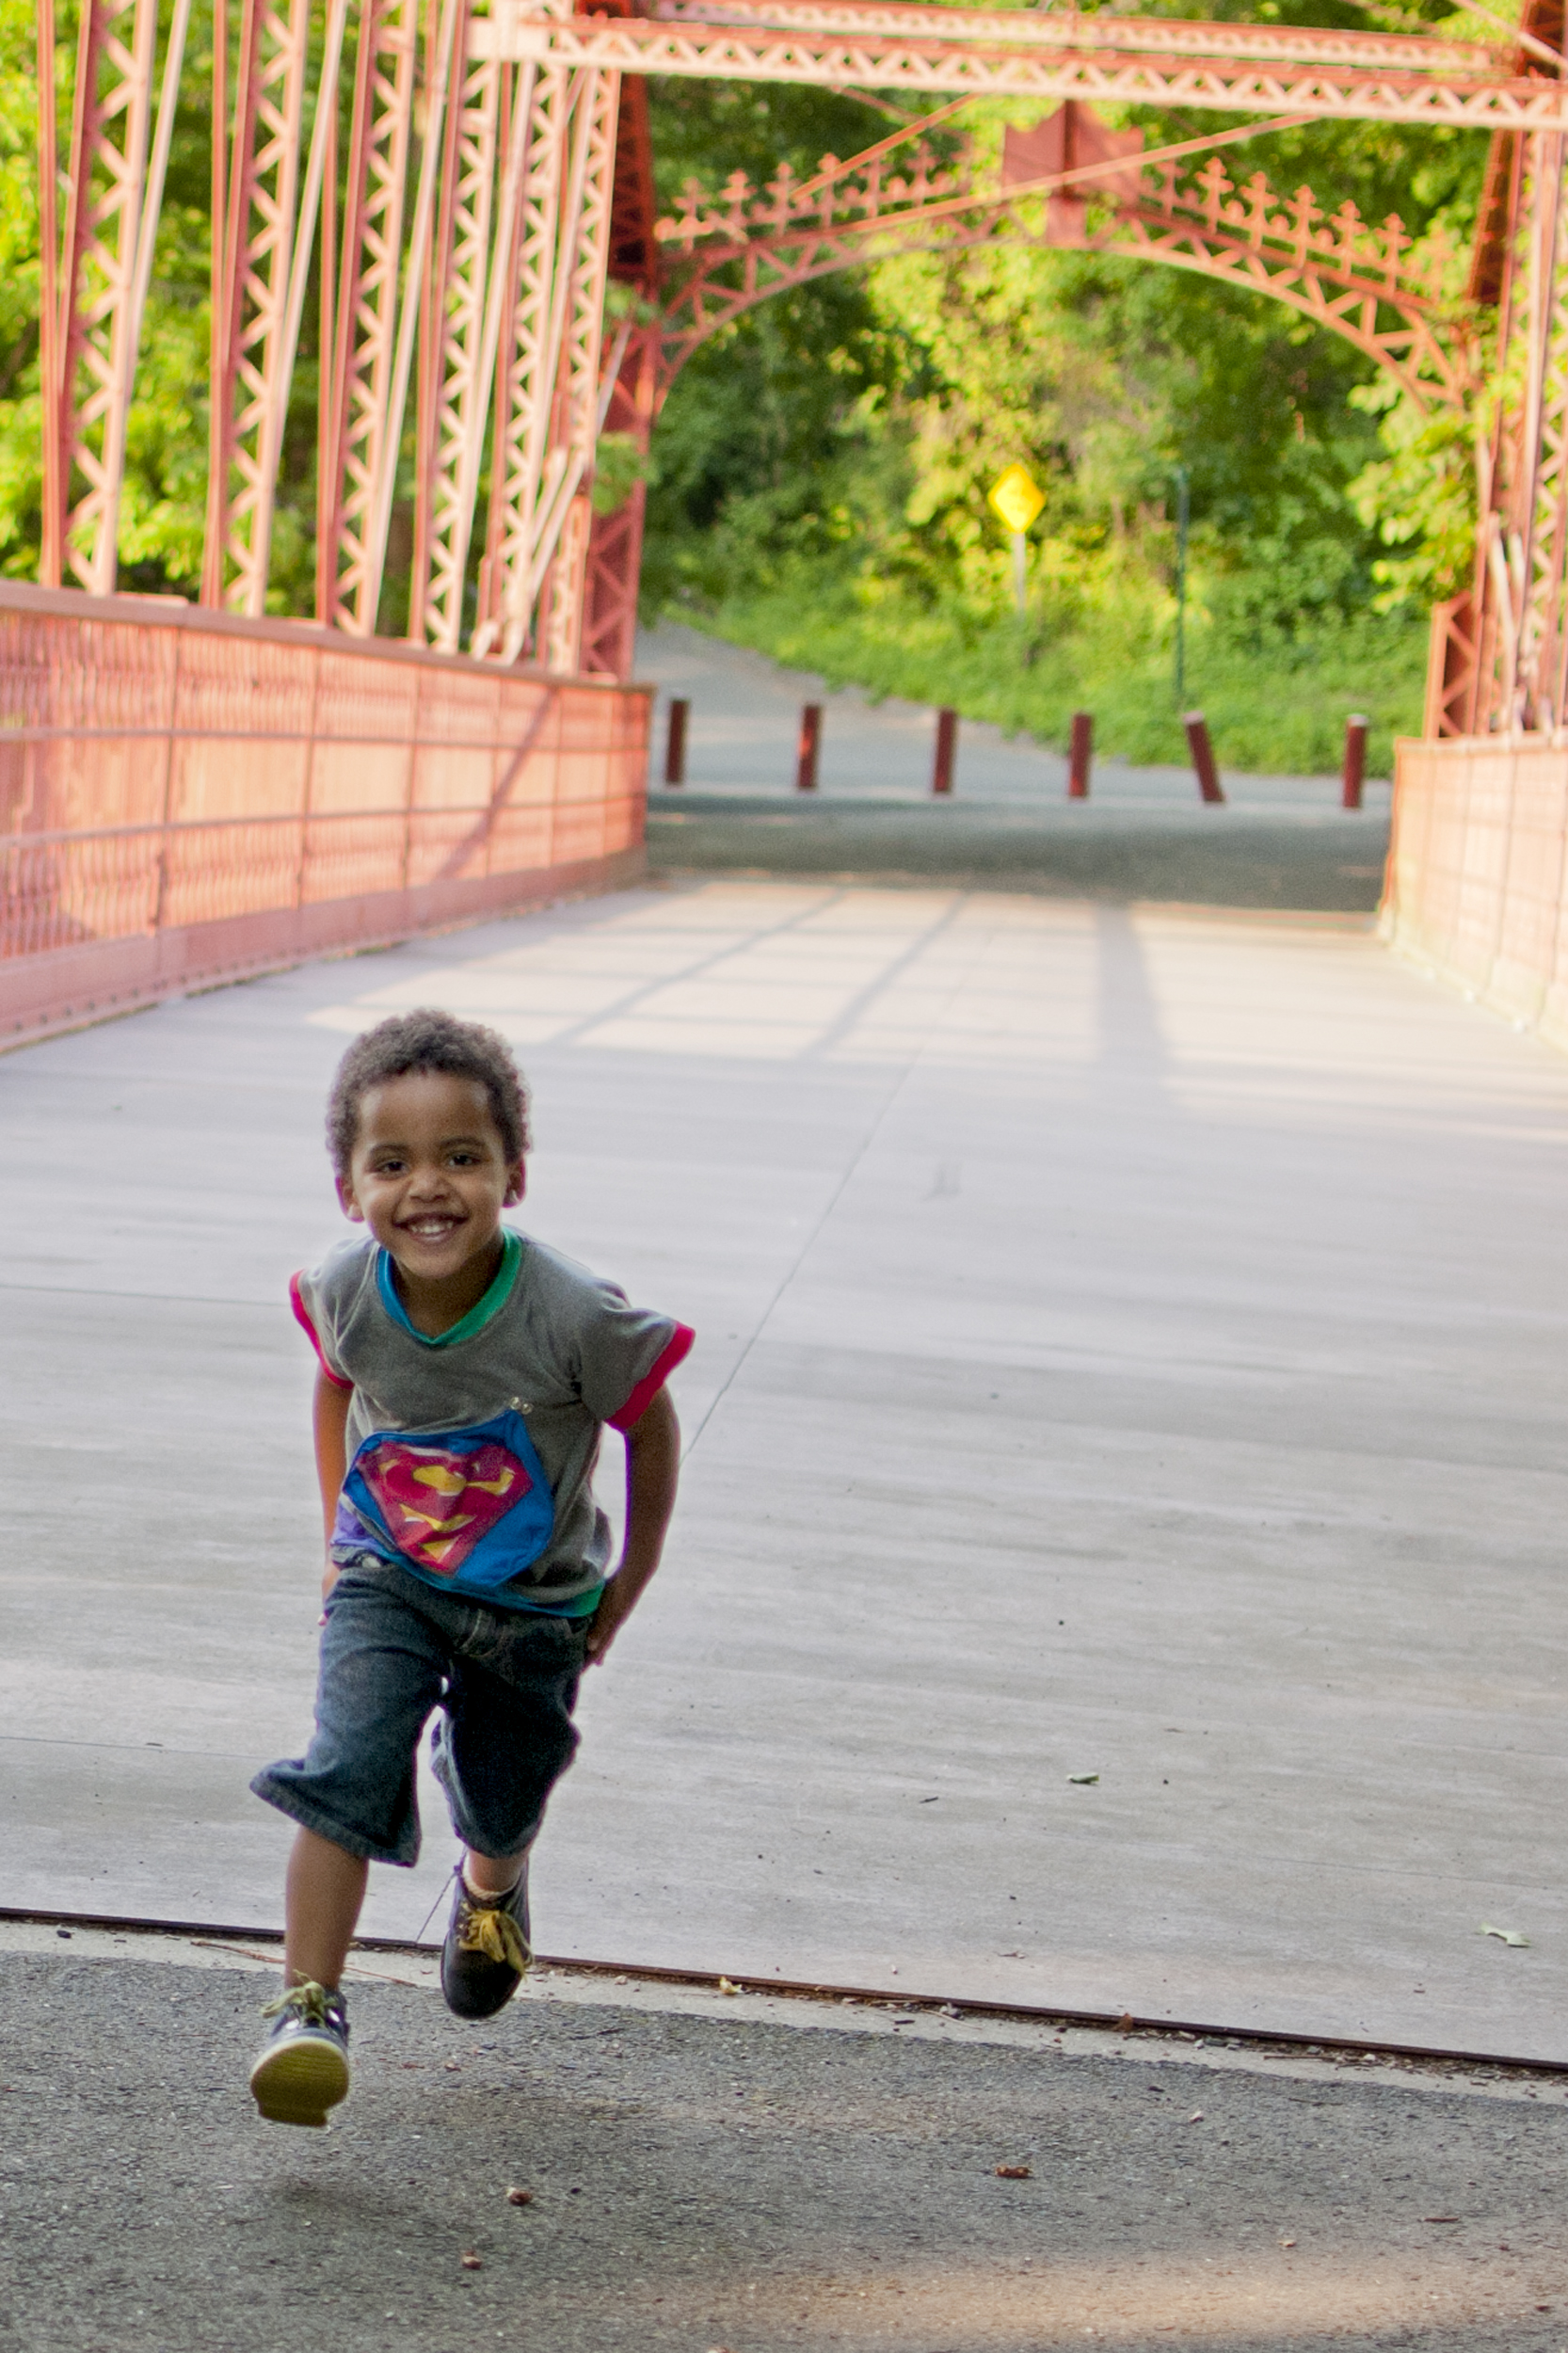
I love it when just something as simple as a shirt sends them on imaginative adventures. He is flying if you couldn’t tell!


RTC_6616

Now back to the snaps. When the zipper is open to reveal Superman it needed a way to stay open in order to really see the full effect. That is where the snaps come in to play. They snap together and viola! Here is my little Superman!

RTC_6638


As you can see there is a little color blocking going on as well. That is mostly because I didn’t feel like doing hems. I shortened the pattern in the arms and body in order to add the hems from another shirt to give that color blocking effect! This made it fun in the back too!

RTC_6700


My oldest has already asked if he could have one too! I was going to make him one for this post as well, but because I am a super horrible procrastinator I wasn’t able to get it done in time. That will happen sometime this summer as I would love to put a tutorial out. This way every little boy can have their own superhero reveal!
Make sure you check out her blog to see all the other wonderful creations in this series and enter the giveaway!


Baby Suite for Sweet Babies!

10313589_10203801489628276_5810482836900479156_n

If you have been following my new RebekahSews Facebook page you would have seen sneak peeks of a very cool pattern suite that was released yesterday! I am very excited about this one!  Could you tell?  Stitchwerx Designs introduced us all to the Ainsley & Aiden Baby Suite. This suite is a set of 4 patterns, but in my opinion it feels like much more. When I think of Stitchwerx I think of thoroughness. Kim always takes the time to point the seamstress in the right direction before even sewing. In these patterns you will find a glossary of terms, tips for sewing with knits, a quick faux cover stitch tutorial, and even links to places to buy knits. The suite ranges from beginner level to intermediate level and comes in sizes Preemie-12m. Now those with bigger babies don’t feel left out. Kim is working on these in bigger sizes too, no dates as of yet though.

RTC_4143

I got to test all the patterns and, well, I think the photos speak for themselves. I will tell you a bit about each though! First up we have the Tiddly Wink Toppers. With this pattern you can create a slouchy or square knit beanie. It’s totally reversible too! It is very easy and quick so you can easily make a bunch at once making your baby the envy of all the other bare headed wee ones!

RTC_4284

Next up we have the Comfy Caterpillar Pants. These are an amazingly easy and fast sew. They are a confident beginner level pattern as working with knits is a bit harder than wovens. These feature a no elastic waistband and cuffed or non-cuffed pants. Really so cute!

RTC_4156

Thirdly we have the Bitty Beetle pattern. Now this one you are really getting three patterns in one as it includes the bodysuit, tee, and gown! There are three sleeve options as well: short, long, or extra long with mitten. I just love the lap neckline as it is so much easier for dressing. I think this one is my favorite out of the bunch!!

RTC_4239

RTC_4130

Last but not least is the Roly Poly pattern. This pattern is just darling but is an intermediateRTC_4516 pattern as they are fully lined and include front and back pockets. These are a great pair of pants for those ever growing babies as the legs are extra long. This means they can be cuffed to show off those cute contrasting fabrics but then can be let down as they get taller. I sewed mine just using wovens, but you can sew these with knits or even both knits and wovens.

RTC_4528

RTC_4535

Ready for the fun part?? I made some extra special pieces just for this tour and because I love these patterns!! RTC_6106One of my favorites, and now a staple, is the Bitty Beetle. I just love the gown. I made this one with short sleeves which is just perfect for the warmer months. RTC_6114I like to keep the bedroom on the cooler side and baby girl never likes to keep her blanket on. This keeps her covered so she is not too cold or hot! I love that the elastic at the bottom isn’t too tight too. She is able to move around in it just fine without getting frustrated. Just look at those cute baby toes peeking out!!!

RTC_6138


It’s summer here (finally!!!) so cooler outfits are a must. So I decided to do a few modifications to meet our needs. First I wanted baby girl to have a cute pair of comfy shorts. RTC_6074So I used the Comfy Caterpillar and shortened them. This is the 6mo size and I was able to use the Preemie with cuff cutting line to get the length I liked. I was so lucky that I didn’t have to measure! Then for the top I made two modifications. RTC_6064The tee cutting lines in the pattern are straight down and meant to be more of a fitted style. I wanted something with a little more room this time in order for a flowier feel. So instead of cutting the sides on the tee lines I actually cut on the gown lines as that flares out a bit.RTC_5939 Now I really wanted a flutter like sleeve as well. So I cut my short sleeve pattern piece in half and added extra width in order to gather to create that flutter. I think next time I might shorten the length too! Add a little appliqué and viola! You have a perfect summer outfit. There will be many more of these!!!

RTC_5928

Don’t you just love the versatility this suite has to offer?? I know I do. You can purchase the suite on Etsy at the special bundle sale price of $18.75! That’s less than $5 per pattern! This special price is good till Friday June 20th. Now if you are feeling lucky Stitchwerx is doing a giveaway as well! Head on over to Kim’s blog to enter to win some great prizes! Also make sure you take a look at all the other bloggers on this tour. You will certainly get your daily dose of cuteness from them!!!

RTC_6017


Wednesday June 11

Pattern Revolution

Mama Says Sew

The Berry Bunch

Begin With B


Thursday, June 12

Rebekah Sews  (You’re already here!!)

Lulu & Celeste

Gloria June


Friday, June 13

Once Upon a Sewing Machine

Feather’s Flights

Pattern Nut


Monday, June 16

Golden Rippy

Playground Pixie Designs

Friends Stitched Together

The Life of Jennifer Dawn


Tuesday June 17

Stitch and Bake

Shaffer Sisters

The Life of a Compulsive Crafter


Bitty Beetle Review!


RTC_5800

You may have heard about a cute baby suite of patterns releasing tomorrow. If you haven’t then I will give you the lo-down! Stitchwerx Designs is releasing the Ainsley & Aiden Suite tomorrow that consists of 4 patterns (but feels like more) ranging in sizes preemie-12M. Now when the Sew and Tell group on Facebook asked me to do a little review, how could I say no? I tested all the patterns in the suite but today we are going to take a closer look at the Bitty Beetle pattern!

RTC_5806

The Bitty Beetle is bursting with options. This is a lap shoulder neckline top, but not just a top. Included are the patterns for a tee, bodysuit, and gown! See what I mean when it seems like more than just 1 pattern? First let me tell you about the detail Kim puts into her patterns. Firstly the pattern pieces are digitally drawn and nested, which helps save on paper. My favorite feature is the cutting chart right on the pattern pieces! No need to keep looking at the computer while cutting!

RTC_5817


RTC_5794

The actual tutorial doesn’t start till page 17. Why, might you ask? Well from the beginning she walks you through every step to help you prepare before you start sewing. There is the normal fabric layouts and cutting charts, but there is also much more! She goes over several mitten options (yes you can put mittens on these!) so you can pick the best for your needs. There is also a review on binding with different ways to sew it in place. There is glossary for different terms, hints for sewing knits, and even websites to buy knits. Now at the end of the tutorial is another quick tutorial on how to do a faux coverstitch. This turned out to be pretty handy for me as I was able to sew my first faux coverstitch on this project using a twin needle!

RTC_5790

Once you start sewing, the instructions and photos take you step by step to create your beautiful garment! This is classed as an intermediate pattern because binding can be tricky. However, a confident beginner could do this too!

RTC_5828

RTC_5808

For this review I chose to do just the gown. I really love gowns for my little one to sleep in during the spring and summer! They are roomy and keep her warm even with the fan going especially since she doesn’t keep a blanket on! I know from experience that finding store bought gowns for bigger babies can be tricky. Wanting short sleeves as well is almost impossible. No need to search anymore as I can create my own! This is a pretty fast sew too which is a plus. I think the longest part was getting thread together for the faux coverstitch since I needed two to match. LOL. The way the body of the pattern is cut gives ample room for moving too. The knit I used for this one has very little stretch. Now you should use knit with ample stretch per the pattern but this has been hanging out for awhile and I wanted to see if it worked. It did and turned out cute. The length is great for keeping my little one covered, and the elastic at the bottom is not too tight or loose but just perfect for a very active 9mo old.

RTC_5838

RTC_5834

This pattern, with the others in the suite, isn’t releasing until Wednesday. Pattern Revolution, however, is hosting a giveaway to win the patterns before they are released! You have till the rest of today to enter. So head on over there enter. Don’t forget to like Stitchwerx Designs and my Facebook page for more entries though!  And don’t forget to come back on Thursday to see more goodies that I have sewn using these patterns!

RTC_5873